LibRaw articles

Canon: How To Get 400/5.6 In Five Different Ways

While preparing for my summer trip to Altai, I attended to choosing the telephoto lenses I was going to carry. I needed a regular telephoto lens for shooting water attractions (Katun is very large river and the target can be very far away) and an extra long reach lens for shooting the full phase of the solar eclipse.

The goal was to select a 400 mm as a long lens, and as much as possible for the extra long one. After looking around and asking some friends I found the following possibilities for a 400mm with Canon:

  • EF 400/5.6
  • EF 300/4 + TC1.4
  • EF 200/2.8 + TC2
  • EF 70-200/4 + TC2
  • EF 135/2 + TC2 + TC1.4

Surprisingly, even the last option on the list (the one with two teleconverters stacked) did not seem hopeless: I tried that option for film a while ago, and it was comparable with a 70-200/2.8 with a 2x TC.

Peace in Lights

As it was shown earlier the direct application of exposure to the right method (ETTR) without preliminary scene analysis and evaluation often results in a major underexposure which in turn causes poor details, noise, and artefacts. In order to evaluate the necessary depth of tone correction for such underexposed shots we will use the following natural method we will return the zones containing details of high visibility (those are zones from IV to VI) to target density values. Such a move makes sense because in order for those details to be really visible, they need to be in those zones.

How to stretch 2.5 eV to 5; and what would be the price

In the photographic community, the common perception is that the exposition scale is symmetrical. The perception dates back to Adams: the Zone V is in the middle of the range, with 5 zones above and below it, top and bottom being symmetrical: there are 2 zones each way containing details, then one more each way with traces of textures, with the final two (one each way) which are respectively completely void white and solid black. The 2x (1eV) changes in brightness correspond to the transition between the zones.
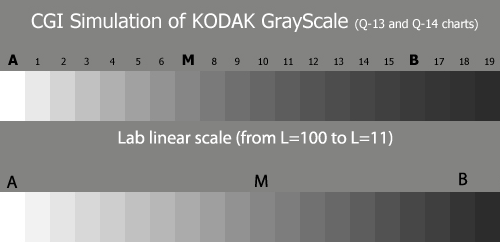
The photographic zone step wedge is not visually (perceptually) even. For instance in the Kodak Q13 grey wedge (the top scale on the image to the left), where the distance between the two neighboring patches is 1/3 eV, we can clearly see that in the lighter part, this distance between the patches seems visually large, and in shadows visually small, as if the steps are compressed. The Q13 wedge encompasses Zones I through VII, although not representing the brightest part (further on, we will see that they cannot be represented at all by an evenly distributed wedge).

Headroom in Highlights : Where is Zone V in The Digital World?

We will try to demonstrate here why there is no more then 3 stops headroom in highlights between the exposure suggested by the spot-meter and the clipping point of the raw data. We presume the camera follows the current ISO standards; the sensor is single-structure (not like those Fuji S5 cameras have); the capture is obtained in 1 shot; and that the raw data is linear.

Using Magenta Filter for Shooting With a dSLR Camera Under the Daylight

In the previous article and during lengthy discussions on various forums, we promised to demonstrate the usefulness of magenta filters. Those filters compensate the imbalance between the sensitivities of color channels in digital cameras. Promises should be fulfilled, and having this filter, it takes nearly no time to prepare the demonstration given that you have that sunlight...

Renditions of Three Popular Colour Targets

These Lab renditions of Macbeth ColorChecker, ColorChecker DC, and ColorChecker SG (attached archive contains three 16-bit Lab TIFF files of the targets; if you need them larger please upsize in Photoshop using "Nearest Neighbor" method in Image -> Image Size) can serve as a visual reference as well as for adjustments "by numbers" during raw conversion and post-processing.

Please note that ColorChecker SG contains a structure very similar in appearance to 24-patch regular ColorChecker; but the values of patches are in fact different.

White Balance in Digital Cameras: Problems

Current digital cameras provide the photographer with what is considered to be excellent means for instant diagnostics of an image right after the shot is taken.

  1. We can evaluate the shot on the LCD screen.
  2. The camera is nice enough to display a histogram (luminosity histogram and for many high quality cameras, per channel histograms as well).
  3. Finally, the camera can display zones of clipping for both under and overexposed parts of the image.

Zones and Digital: Two Methods of Exposing

The question whether one should expose "to the right" or should it be "exposure for the subject" (centred exposure) causes a lot of discussions when it comes to digital capture. Technically, this boils down to a simple question of placement lightly textured whites, like snow - should those be hitting the right wall of the histogram; or should they be placed about 2 stops lower, to the left on the histogram; or even somewhere between 0 and 2.

Spot-Metering: Reading Adams in Reverse Direction

What is the connection between exposure and raw converters? Or, to put it another way, why consider exposure on this site?

For that, there are two reasons. First, we would like to discuss various photography-related topics. Second, the quality of the resulting image largely depends on the correct exposure, as do the time and the effort spent during the conversion.

Lets start with the definitions Adams suggested to the zones.

Pages