What is the connection between exposure and raw converters? Or, to put it another way, why consider exposure on this site?
For that, there are two reasons. First, we would like to discuss various photography-related topics. Second, the quality of the resulting image largely depends on the correct exposure, as do the time and the effort spent during the conversion.
Lets start with the definitions Adams suggested to the zones.
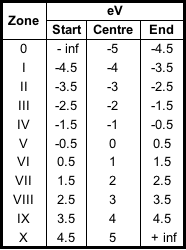
The zones are separated by one step eV, the borders of the zones are about half a stop (½ eV) from the denoted centres.
Zone 0 spreads about ½ eV into the region of higher exposures (lower densities), and towards infinity into the region of lower exposures; while Zone X spreads about ½ eV into the region of lower exposures (higher densities), and towards infinity into the region of higher exposures.
- Zone 0
- Black, no texture or detail.
- Zone I
- Near black, no detail. Darkest beginning of gradation.
- Zone II
- Dark gray-black, possibility of slight texture, you think you see it - maybe. Mostly gradation.
- Zone III
- Important Zone, very dark gray, but good texture and detail can be seen. Dark textured bark on shadow side of tree. Where you will probably want to "place" your shadow details. Darkest detail and texture.
- Zone IV
- Medium-dark gray, dark green foliage, shadow side of Caucasian skin. Details plainly visible.
- Zone V
- Your meter's suggested settings. Medium gray, Kodak 18% Gray Card, clear dark blue Northern sky, excellent detail visible. (We need to mention here that modern spot-meters are calibrated somewhere between 12% and 14%, most often to 12.7% = 18%/SQRT(2) that is ½ eV darker, with the goal of better preservation of highlights.)
- Zone VI
- Rich mid-tone gray, average Caucasian skin in sunlight, shadowed snow on bright sunny day, sharp fine detail visible.
- Zone VII
- Bright light gray, highest Zone that will still hold good details. Weathered white paint, silver hair.
- Zone VIII
- Light gray-white, shows last texture (minimum) but no detail. Reflected highlights from light colored skin, textured snow in sun. Gradation exist.
- Zone IX
- Almost white, must be compared to white to tell difference, no detail or significant texture visible. Lightest gradation values.
- Zone X
- Reproduces as paper base white, no image recorded. In print, will appear as specular highlights, sun reflection from chrome bumper, sunlit drops of sparkling water, etc.
The key does not necessarily appear in the beginning of the record. Reading each zone descriptions backwards one can easily see that those descriptions contain very specific statements on the level of details perceived in each zone. Often the statement is in the end of the particular description. For those zones that contain most important details the statement is always at the end. The total number of zones where Adams suggests perceivable details do exist is only 5 from Zone III to Zone VII. Evaluating a particular scene one can decide where he or she wants the highest possible level of perceived details; and what should be the brightness of that zone. The choice of brightness is limited for best detail perception. Only 3 zones qualify as comfort zones to contain the details the viewer can fully appreciate, those are: Zone IV to Zone VI. If your spot-meter places everything into Zone IV, all you need now is to decide on the initial compensation for the particular scene. It should be 1 eV or 2 eV, once again depending on the desired brightness of the zone containing important details. This way there is much less guesswork and the results are much more predictable.
Andrey Tverdokhleb who designed the raw processing software RPP (Mac-only, http://www.raw-photo-processor.com/RPP/Overview.html) suggested to add the following. The method above works just as well and does not depend on the dynamic range of the camera. However, one should account for the fact that in the case of a camera with a very limited dynamic range Zone IV may already contain visible noise.

Add new comment