Zones and Digital: Two Methods of Exposing
The question whether one should expose "to the right" or should it be "exposure for the subject" (centred exposure) causes a lot of discussions when it comes to digital capture. Technically, this boils down to a simple question of placement lightly textured whites, like snow - should those be hitting the right wall of the histogram; or should they be placed about 2 stops lower, to the left on the histogram; or even somewhere between 0 and 2.
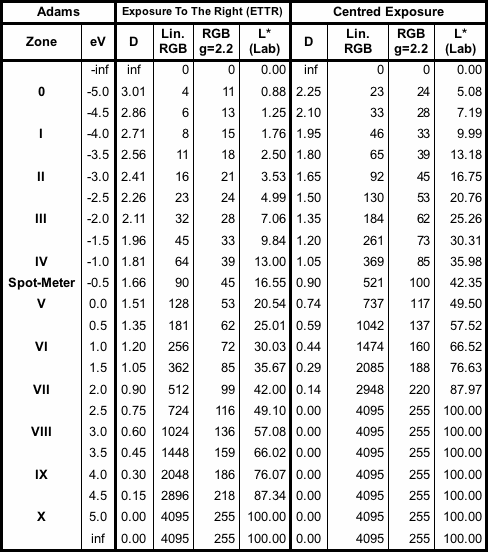
The table below compares two exposure techniques, the centred exposure and exposure to the right (ETTR) at base ISO and for a fully exposed channel (for the majority of the cameras and shooting conditions Green channels are most exposed), not taking the white balance into account. As you can see, exposure to the right results in substantial, 2.5 stops, underexposure of middle tones - instead of "prescribed" middle RGB value of about 117 at Zone V we have only 53, that is Zone V is exposed to somewhere between Zones III and II. Exposing for highlights is ETTR, and it is very close to dialing -2.5 eV compensation for the spot-meter. In this case contrast and density distribution with default converter curves will be obviously wrong, unless a converter has an ETTR mode of conversion. Once again, noise in shadows, especially on higher ISO settings and under artificial light can become a very serious issue.
Centered exposure suggests that there is slightly less then 3 eV headroom from spotmeter readings to the highlights (instead of nearly 5 stops in the case of ETTR). However shadows have rather high values and are essentially much less noisy and more detailed then with ETTR method. It can be said that on a resulting image dynamic range is re-distributed compared to ETTR, favoring highly detailed midtones and noiseless shadows.

To account for the white balance one can divide linear RGB values by white balance coefficients. This makes ETTR even less attractive, as now for a typical camera daylight shots Red and Blue channels are additionally underexposed 1/2 stop; under incandescent light underexposure of the Blue channel can be more then 2 stops. No wonder that with "exposure to the right" many cameras will exhibit an excessive amount of noise even in midtones if those are brought up to target RGB values of about 117 in conversion or post-processing. Images like that are often lacking details, and can't be sharpened in an effective manner because noise becomes intolerable. The alternative is to leave midtones at low RGB values; but then the image looks flat and underexposed.
Same happens when ISO is bumped in the camera. We increase sensitivity in order to compensate for the decrease in of the number of photons hitting the sensor. Each stop of ISO bump is effectively counter-acting devision of linear RGB values by some value close to 2; the exact value depends on the analogue circuitry used in the camera. The smaller is the photon count in midtones the higher is the noise. Details become fuzzy, level of details decrease. The higher is the ISO setting, the more important in terms of overall image quality and image usability it becomes to expose for the subject.
Certainly in a lot of scenes higher values of Zone VIII as well as Zones IX and X are nearly absent and can be ignored completely; in such cases both methods produce results close to each other.
Interesting exception however is Fuji S5. Due to the double structure of the sensor those cameras have, when the main sensor is exposed to Zone V the secondary is exposed about 3.5 stops higher, between Zones VIII and IX. This way for centred exposure the whole range of the zones is captured at base ISO and even at 1 stop above base. However a special tone curve is needed here to compensate for the flatness of the image that results from a regular type of tone curve.
For a raw converter developer it makes sense to use a "Zone V" slider to control the tonality of the rendered image. Effectively this slider counteracts the decision on shifting Zone V taken at the time of shooting. This slider is nothing more but one of the parameters controlling the shape of the tonal curve applied during conversion. In many cases the initial value for this slider can be set to the amount of eV compensation as it is recorded in the raw file. The slider range of -5 to 5 eV proved to be sufficient in the testing. The other useful slider sets the dynamic range for the resulting image.

Recent comments